$$$ KPO and CZM $$$: July 2019

Monday, July 29, 2019

BTO Guide - 4 Things To Look Out For When Selecting Your Kitchen Sink

Our house is almost done with the tiling! It is about time to kick start the carpentry discussion process with our ID. Our ID has instructed us to start looking out for the refrigerator, kitchen sink, and bathroom sinks as this will affect the carpentry measurement.

Hence, in this post, I will be sharing some of the tips I have gathered on kitchen sinks. Hopefully, it will be useful for new homeowners like us.

1. Kitchen Sink Material
There are many types of materials used for kitchen sink. Most common ones are stainless steel, copper and porcelain. Each has its pros and cons.

Stainless Steel:
Pros
- Durable and cost-effective
- Will not rust
Cons
- Require regular cleaning as it may show water spots
- May scratch when abrasive materials or cleansers are used

Copper
Pros
- Beautiful
- Will not rust
- Antimicrobial properties (bacteria cannot survive more than a few hours on a copper surface)
Cons
- Highly reactive and will develop a distinctive blue/green patina over time

Porcelain 
Pros 
- Durable
- Available in a wide range of colours
Cons
- May scratch when abrasive materials or cleansers are used
- May chip

My personal preference is the stainless steel as I like the looks of it and generally more pocket-friendly. For those who are also getting stainless steel sinks, do note to avoid highly polished stainless steel since stains and scratches are less visible in brushed and matte finish. In addition, the thickness of the stainless steel also matters - thicker steel (ideally around 1.4mm - 1.5mm) is generally less noisy than a thin one. I was also reading somewhere which says that a good quality stainless steel will not hold a magnet. Will bring a magnet the next time I go for my sink shopping. Hopefully, I do not appear too weird to the shop owners.

2. Top Mount VS Bottom/Under Mount VS Flush Mount
The two most common type of sink installation are the top mount and bottom/under mount sinks.

Top Mount Sink - Taken from renonation.sg

Bottom/Under Mount Sink - Taken from renonation.sg

Both the top and bottom/under mount sink have its advantages and disadvantages.

Top Mount Sink
Pros:
- Cheaper to install
- If the countertop is produced using delicate material (e.g. marble), a top mount sink helps to secure the edges
Cons:
- Bits of food can easily get stuck underneath the edges of the sink, causing the development of mold and bacteria

Bottom/Under Mount Sink
Pros:
- Beautiful
- Food and spills can be easily cleared directly into the sink with no obstacle at the edges of the sink
Cons:
- The cement that holds the sink are often not waterproof and upon contact with water may loosen, causing the sink to fall
- More expense to install

I had always wanted a bottom mount sink as it is more aesthetically pleasing. However, recently I attended a talk on flushed mount sink and was completely sold.

Introducing the Flush Mount Sink:

Taken from renonation.sg

Taken from renonation.sg

As the name suggests, the flush mount sink is completely flushed to the countertop, hence you won't be able to feel a bump at the edges.

Pros:
- Easy maintenance as the bits of food or spill will not get stuck to the edges
- Beautiful
Cons:
- Very expensive lor
- Very limited choices available in Singapore, which means the prices are a lot more expensive as compared to top and bottom/under mount

The last point is the main deal breaker as I can hardly find much choices in the market now. As such, I may end up likely choosing the bottom/under mount.

3. Depth of the Sink
Avoid choosing a sink with a shallow depth as you may end up with water splashing out easily. A 9 or 10 inch sink will be more suitable. If you decide to go for the bottom/under mount, you will need to factor an additional 1 inch of depth (for the countertop) as you may get backache if it is too low.

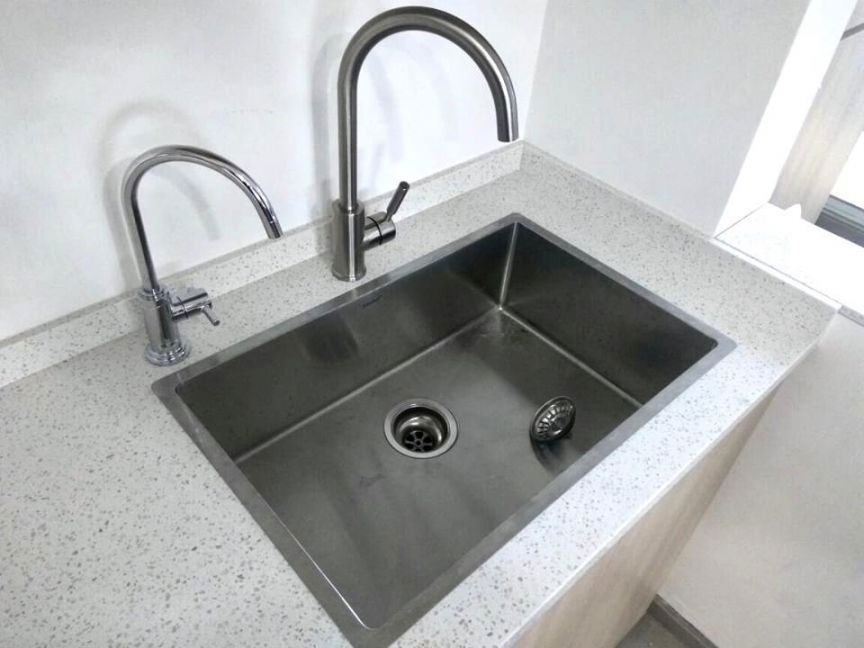
4. Position of the Drain
I was quite indifferent to the position of the drain until I came across an article which talks about it. A rear drain towards the back or edge of the sink means more usable space in the base cabinet and better drainage when dishes pile up in the sink.

That's all I can summarise based on my intensive research for the past weekend. Do leave a comment if you have anything to add to the above.

You might be interested in these other BTO Guides:
BTO Guide - Tips on Selecting Air Con
BTO Guide - 4 Things To Look Out For When Selecting Your Kitchen Sink

Do like any of the following for the latest update/post!
1. FB Page - KPO and CZM
2. Twitter - KPO and CZM
3. Click here to subscribe using email :)
4. Instagram - KPO_and_CZM (Did you see those delicious food photos to the right --> Unfortunately, you can't see it on mobile.)

Wednesday, July 24, 2019

BTO Guide - Tips on Selecting Air Con

KPO and I have collected our keys about 2-3 months ago (see BTO HDB Key Collection & Door Opening Ceremony) and we have taken quite some time to select and shortlist our interior designer (ID). Now that we have locked down our ID and began our renovation, it is time to do some shopping for the house.

One of the initial items after we kick-start our renovation process was to check out the air con as the wiring/piping installation needed to be done almost the same time as the electrical wiring. We googled quite a bit on the different types of air-con and things to look out for. Over the course of a weekend air-con shopping, we learnt how to read air-con models and also noted some of the key features to look out for when purchasing an air-con.

How to read an air-con model?
Taking the latest Samsung 5 Ticks Multi-Split Inverter System 4 model AJ038RCJ4EC-3XAJ009MBADEC-1XAJ024RBADEC example, the first few numbers you see in the model (i.e. "038" represents the maximum capacity of the air-con. This means that the air con can operate at a maximum of 38k BTU. I will be explaining BTU shortly below. The next one after the first dash "-" represents the number of split air-con that comes with it, i.e. "3" air-con with "9"k BTU and "1" air-con "24"k BTU.

Similarly, for the LG ArtCool+ model A4UQ30GFA0-3X09GDJR0-1X24GDKR0, this means that this is a system 4 air con with a maximum capacity of 30k BTU combined, with 3 split air-con of 9k BTU and 1 split air-con of 24k BTU.

So below are some of the items we looked out for:

1. BTU (British Thermal Unit)
This represents the measurement of how much energy is required to raise the temperature of one pound of water by one degree. In the case of air-con, the bigger the room, the more BTU it requires to cool the room. In addition, you will probably need more BTU for a room with many windows (i.e. more sunlight) or people. There are many BTU charts and calculators online, one of such can be found here.


2. Air Con Capacity
Looking at BTU itself is insufficient as the ability to cool a room depends on the maximum capacity of the air-con as well. Taking the same Samsung example above, the model AJ038RCJ4EC-3XAJ038RCJ4EC-1XAK024RBADEC comes with a maximum capacity of 38k BTU. This means that at any one point in time, I can either switch on all the rooms which utilises about 9k x 3 rooms = 27k BTU, or 1 living room + 1 bedroom which utilises about 24k + 9k = 33k BTU. Otherwise, the rooms will be less cold.

On the other hand, the same LG model above with a capacity of 30k would mean that if I want to switch on the living room's air-con, I will not be able to sufficiently cool any other room.

3. System 3 + 1 or System 4?
KPO and I were deciding between getting a system 3 + 1 or system 4 for our entire house, including the living room. It will ultimately depend on your needs. Referring back to item 2, if you think that it is likely that you will switch on the air con for the entire house at any given point in time, then it will make sense to get system 3 + 1. This means that the air-con comes with 2 compressors i.e. more BTU capacity. However, this also means you require more space on your air-con ledge and more money involved as well.

4. 2 Ticks or 5 Ticks?

Taken from NEA Energy Label website
It really depends on what you think will be your usage level. At one glance, one may think that the energy/electricity cost is a lot higher for 2 ticks model based on the energy label. However, it is an annual cost with certain assumptions - Based on 27 cents per kWh electricity cost, 8 hours daily usage and 16 hours standby energy consumption. We know the cost of electricity has decreased significantly since Open Electricity Market (OEM) happened and will you really use your air con daily?

KPO and I were initially thinking of 2 ticks because (1) initial outlay is a lot lower; (2) I doubt we will use the air-con often, hence electricity savings will not be substantial. However, we eventually bought the 5 ticks one because we eventually managed to get a good deal from Gain City.

By the way, 2 ticks is the minimum number of ticks allowed in the market currently and 5 ticks is the maximum number of ticks available in the air-con market for now. You can read more about it here - NEA Energy Label.

5. Air Con Piping
The type of air con piping used is important as well because an inferior quality pipe will result in leakages. Ideally, the insulation used should be 3/8 inches for piping in trunking or 1/2 inches for piping that is hidden by false ceiling. Do check out if your air con provider provides a free upgrade of the piping.

6. Other Considerations
Some other considerations when selecting air con include:
- The looks of the air con (see the above LG model. It really looks so aesthetically pleasing)
- The brand reliability / after sales service
- Other features such as wifi (for smart homes)

In the end, we bought Samsung 5 Ticks System 4 (3 x 9k and 1 x 24k + 38k outdoor compressor) from Gain City for $4199 (actual $4599) with upgraded piping. Gain City was giving $400 voucher for next purchase but we went down to the store in IMM which just sells air con and the staff deducted it from our purchase immediately. In addition, he was still able to give us an additional $80 voucher for the next purchase + a few $50 furniture vouchers (with a minimum purchase of $700).

We also opted for 2 separate installations at an additional fee of $85 (first to run/do the piping and only mount/install the air con once the renovation is completed). This is to prevent the renovation workers from using/switching on the air con... Last but not least, do sign up for their membership program as you will be able to get 1% cashback/points for next purchase.

Hope this list would help the new homeowners in purchasing their dream air-con. Let me know if I missed out any other important air-con attributes to look out for!

You might be interested in these other BTO Guides:
BTO Guide - Tips on Selecting Air Con
BTO Guide - 4 Things To Look Out For When Selecting Your Kitchen Sink

Do like any of the following for the latest update/post!
1. FB Page - KPO and CZM
2. Twitter - KPO and CZM
3. Click here to subscribe using email :)
4. Instagram - KPO_and_CZM (Did you see those delicious food photos to the right --> Unfortunately, you can't see it on mobile.)

Tuesday, July 16, 2019

Lazada x Anker Surprise Box

Lazada had its Mid-Year Festival/Sale recently and I decided to buy another surprise box again. I blogged about my purchase of a Lazada x Spigen Surprise Box (Lazada Surprise Box - Save or Waste Money?) a few months back and thought it was pretty decent.


Lazada x Anker Surprise Box costs $49 on that day and we can sort of expect a wireless earphone, portable powerbank + a disappointing surprise. It was delivered to my house the next day.

Lazada x Anker Surprise Box
The box itself was a disappointment compared to the Spigen one. #NoEffort

Upon opening the box...
To my horror, the 3rd item was a $30 micro USB cable?! Who will actually pay so much for a cable and it is not even USB-C cable -.-


These are the items in the surprise box. They even have a breakdown of the cost/value of each item and the total came up to $158.80 (~69% savings) but the feeling is different this time round.

Being a KPO, the next thing to do is to check how much it is really sold at the Anker Lazmall shop:
Anker PowerCore Lite 10,000 mAh Portable Powerbank @ $49.90
- Anker Soundbuds Sport Bluetooth In-Ear Earbuds @ $79.00
- Anker 3ft Micro USB Cable @ $16.90

If I were to buy these items now, it will cost $145.80. Not even enough to meet the $150 worth of product. Had they packed a USB-C cable, it would have been $150.90 and I would be speechless. Oh well, it was a good deal even without the cable.

As usual, CZM was saying I am wasting money but she went on to take the wireless earbuds cause she liked it and always wanted one. #TrueLove

What else did I buy?


Kingdom Hearts III (PS4) @ $39.90 (applied $10 voucher)Current Price: $69.90


Roborock 2019 Latest Model S6 Xiaomi Cordless Robotic Vacuum Cleaner @ $522.50 (applied $40 voucher) for our new house!
Current Price: $599

Damn. Looks like I wasted spent a lot of money ~.~"

Do like any of the following for the latest update/post!
1. FB Page - KPO and CZM
2. Twitter - KPO and CZM
3. Click here to subscribe using email :)
4. Instagram - KPO_and_CZM (Did you see those delicious food photos to the right --> Unfortunately, you can't see it on mobile.)

Monday, July 15, 2019

StashAway - June 2019

We stopped contributing to CZM SRS account because she will stop working soon - "Semi-Retirement" For CZM.

Anyway, we have 3 portfolios on 2 accounts now due to our new strategy - New Strategy: StashAway + Supplementary Retirement Scheme (SRS):
KPO and CZM Cash - StashAway Risk Index 20%
KPO SRS - StashAway Risk Index 13%
CZM SRS - StashAway Risk Index 13%

1. PORTFOLIO SUMMARY (as of the last day of the month)

KPO

CZM

Based on the statement (30 June 2019), KPO made $1,225.97 and CZM made $55.46.

KPO

CZM

As of 15 July 2019, these are our portfolio performance:
KPO: $21,794.97 (+18.7% - Capital: $20,000)
CZM: $1,318.79 (+8.6% - Capital: $1,250)

2. PORTFOLIO DETAILS 
Note that these are reported in USD.

KPO and CZM Cash - StashAway Risk Index 20%
KPO SRS - StashAway Risk Index 13%
CZM SRS - StashAway Risk Index 13%

3. FEE CALCULATIONS


The fee stated is based on the monthly-average assets SGD $10,284.15 x 0.8% / 365 days * 30 days = $6.76. Without the referral, it would have been $13.34.


No fee for CZM for the first 6 months.

StashAway VS STI ETF
Since there is no way to compare the performances among the robo-advisors, I came out with a spreadsheet to track our StashAway portfolio performance (General Investing - Risk Level 28) against that of STI ETF which I will be updating on a monthly basis. For simplicity, I shall assume that one can either invest in Nikko STI ETF using POSB Invest-Saver or invest in Nikko STI ETF/SPDR STI ETF using SCB Priority Online Trading (no minimum commission). These would be the opportunity costs while we continue to invest in StashAway.

Apart from the absolute P&L, we should also look at the Reward-to-Risk Ratio where risk/volatility is taken into account. For more information, do read StashAway Clarifications - Reward-to-Risk Ratio. StashAway has the highest ratio of 1.25 which is significantly higher than the other 2 STI ETFs (< 0.4). Let me quote Freddy Lim (Co-Founder & Chief Investment Officer of StashAway), "for every dollar of risk taken, StashAway P28 is producing 1.25 times the return".


This is updated till 15th July 2019 and is based on only 1 of our portfolio - KPO and CZM Cash - StashAway Risk Index 20%.

This month commentary: 
All green with StashAway portfolio providing a double-digit return. Going forward it will be even more interesting when the commissions/fees incurred by StashAway exceed that of POSB Invest-Saver. This will be a battle between cheaper/lesser fees and asset allocation/diversification...

I will be removing this spreadsheet going forward because Evan (founder of StocksCafe) has implemented a feature to add miscellaneous fee either to a particular stock (margin/leverage) or to a portfolio (robo).

StocksCafe


Looking at the time-weighted return (14.15%), we can see that StashAway is outperforming the STI ETF (including fees). In addition, it has lower volatility and max drawdown.


On the other hand, StashAway is underperforming the SPY (SPDR S&P 500 ETF Trust) with lower volatility and max drawdown.

Which is the best? Only time will tell :)

This is the link to our spreadsheet - KPO & CZM StashAway Portfolio VS STI ETF which I have also added to Our Portfolio page.

StashAway Referral Link for Our Readers
Here you go: KPO and CZM Referral Link

You might be interested in previous months update too:
StashAway - December 2018
StashAway - January 2019 - $16,051.10
StashAway - February 2019 - $17,397.81
StashAway - March 2019 - $18,780.96
StashAway - April 2019 - $19,702.85
StashAway - May 2019 - $20,823.09
StashAway - June 2019 - $22,031.43

Do like any of the following for the latest update/post!
1. FB Page - KPO and CZM
2. Twitter - KPO and CZM
3. Click here to subscribe using email :)
4. Instagram - KPO_and_CZM (Did you see those delicious food photos to the right --> Unfortunately, you can't see it on mobile.)

Saturday, July 13, 2019

"Semi-Retirement" For CZM

Nope, we did not strike ToTo (I wish!) but we will be doing something most would not be doing. We dropped a teaser in our previous StashAway - May 2019 post stating that we will stop contributing to CZM's SRS account. Did you manage to guess it correctly?

CZM has resigned from her current job to take a "short" break after working for > 6 years, leading a semi-retired life. Yes, quitting without another job with the plan to travel! People leave a company for many reasons, usually a combination of both push (ridiculous hours, bad culture, etc.) and pull factors (higher pay, more interesting roles, etc.). For CZM, the push factors were definitely huge and it certainly accelerated our RTW plan or caused us to make such a decision.

After accumulating sufficient miles, I blogged about our next goal - Star Alliance Round the World (RTW) in Business Class! The main issue with such an ambitious plan is not the number of miles required or the money it costs (not really true, it was definitely a concern) but the TIME and ENERGY. Most people will have about 14-2x days of annual leaves and taking them consecutively will only mean 2-4 weeks of travelling time which is simply too short. Assuming if we were to spend about 1-1.5 week in each country/stopover, it would take us at least 2-3 months. We played around with a few ideas such as taking sabbatical leave but not all company has such policy especially in Singapore...

As we grow older, our body/health will naturally deteriorate. Looking at our parents now (40/50+), they no longer enjoy travelling as much because it is extremely tiring and their body will start aching. In addition, once you have kids, the cost of travelling will increase while the pace will decrease significantly. It is also impossible to travel with a piece of mind without them. With all these in mind, our decision was to whack and travel first before settling down to have kids. The next step was to evaluate if we will have any issue financially.


We did some cashflow exercise and concluded that we can manage even without her job. This can be done by doing the following:
1. List down all your income sources (salary, dividends, rental, etc.)
2. List down your fixed expenses (insurance premium, taxes, etc.)
3. List down/estimate your variable expenses (food, transport, etc.)
4. List down/estimate upcoming major expenses (vacation, renovation, etc.)
5. Build a table of income and expenses group by Month
6. Pivot the table to get an overview of your cashflow (ideally, income > expenses)

You can find a template of the cashflow exercise here.

We did not list down mortgage/housing loan because that will be deducted from our CPF OA which will not affect our cashflow. Our decision to keep $20k and not let HDB wipe all our OA during key collection has proved to be an excellent and prudent move.

Interestingly, news travels fast and she was introduced to a job where she gets to work with a previous manager whom she enjoys working with. Since there is no harm trying, we both agreed that she should give it a shot and asked for a huge increment. lol.

CZM managed to get into the final round of interview and is currently torn between taking a break from work, doing the once in a lifetime RTW travel or going back to work... My opinion is if the compensation isn't sufficient/ideal, it will be an easy decision. Otherwise, we can always postpone the RTW and do it a few years down the road with/without kids. CZM just can't help worrying...

What do you all think? Were you once in a similar situation, made a decision which you regretted? Is it really impossible to travel once you have kids? Appreciate if you can take some time off to leave your comments for CZM!

Do like any of the following for the latest update/post!
1. FB Page - KPO and CZM
2. Twitter - KPO and CZM
3. Click here to subscribe using email :)
4. Instagram - KPO_and_CZM (Did you see those delicious food photos to the right --> Unfortunately, you can't see it on mobile.)

Friday, July 12, 2019

Expenses - May 2019

I have been binge watching 4 seasons of Lucifer for the last few weeks (not really binge since it took me so long to complete everything), hence the delay in some of our posts. We went to the set/behind the scene during our Warner Bro's Studio Tour at Hollywood last year (Honeymoon to the United States - 3 Days 2 Nights in Los Angeles) and I told myself I need to watch this show. This show is pretty similar to The Mentalist with the supernatural stuff (Angel, Devil, etc.). I like watching police/detective show/anime (Kindaichi and Detective Conan).

Current Profile: 29 years couple who got married recently but staying separately with our own parents while waiting for the BTO project to be completed this year.

Our total expenses were $4,860.15! The breakdown would be as follows:


KPO Expense Fund (our common fund): $993.29


KPO: $2,201.96


CZM: $1,664.90


Parents
$1,360 - This is the total amount we are giving to our parents as allowance.

Vacation
We rented a campervan/RV from Fraserway for the upcoming Canada vacation. Paid a deposit of CA$500 which works out to be $524.89.

$205.43 - The cost of our accommodation in Parkroyal Serviced Suites for our Kuala Lumpur Food Trail - 4 Days 3 Nights.

Food
$613.52 - Our combined food expenses are still on the low side because we are still staying with our parents and I usually skip lunch.

Gift
$379.64 - Bought a gift for CZM during my vacation to Eastern Europe.

$188 - Wedding red packet for a secondary school friend at Grand Hyatt Singapore.

Darling/CZM
$544 - CZM signed up for some massage/facial thingy.

Credit Card
$288 - The fees/cost to buy miles from Citi CNY $8,888 for 38,888 miles promotion

Mobile
$278 - The price of my Samsung Galaxy S10+ with 2 years M1 Corporate Individual Scheme (CORI). The plan I got was mySim70 which cost $45.50 per month for 35 GB data, 300 minutes of talk time, etc. It still makes sense to get the corporate plan ($45.50 x 24 months = $1,092) which costs lower than the retail price of just getting the phone without a contract.

Transportation
$142.33 - Our EZ Link/Account-Based Ticketing (ABT) for the month
$90.88 - Cab

Insurance
$189.00 - This is a fixed monthly cost for the basic coverage - $1 million term life ($71), Early Cancer Care - 150k ($64) and hospitalization ($53).

Others
$20.46 - Treated family, friends and colleagues to food/drinks.

$20 - Gift for CZM's colleague

$14 - Gambling: Toto, the fastest way to fulfill our millionaire dream.

$2 - Bought SSB for multiplier (DBS Multiplier + SSBs + Joint Account = Higher Interest!)

Summary
January 2019 - $11,712.06
February 2019 - $7,301.63
March 2019 - $6,954.84
April 2019 - $5,236.49 ($30,027.34 including the next 5% downpayment)
May 2019 - $4,860.15

Our total expenses for 2019: $36,065.17
Average expenses per month for 2019: $7,213.04

Do like any of the following for the latest update/post!
1. FB Page - KPO and CZM
2. Twitter - KPO and CZM
3. Click here to subscribe using email :)
4. Instagram - KPO_and_CZM (Did you see those delicious food photos to the right --> Unfortunately, you can't see it on mobile.)

Monday, July 8, 2019

Kuala Lumpur Food Trail - 4 Days 3 Nights

I always loved the food in Malaysia, hence when I chanced upon a cheap Jetstar getaway promotion to Kuala Lumpur sometime in April, we booked it right away. The total cost of our flight was S$130+ for two pax, all-inclusive.

Before I start on my food trail, the first thing people need to know about Malaysia and its food is that Malaysia has a huge variety of cuisines due to its melting pot of cultures, and Malaysians are extremely passionate about their food. As such, you can easily find good quality food by word-of-mouth and online reviews.  As we have a ton of food we wanted to eat, we decided that a four-day trip will be just nice for this food trail. Not kidding but we really flew there just to eat and eat!

Day 1


- Miru Dessert Cafe
- Restaurant Oversea Imbi, Kuala Lumpur

The moment we touched down at KLIA airport at 2pm, we immediately called Restaurant Oversea to pre-book the char siew and homemade tofu for dinner that night. The last time we went, the char siew was completely sold out even though the restaurant just opened its doors for business at night! Hence, we learnt our lesson this time by booking in advance.

We decided to check in our hotel at the new Parkroyal Serviced Suites Kuala Lumpur which is strategically located near Pavilion Mall. We booked the lavish studio suite which is standing at around 54 sqm at S$100 per night. We also managed to get 1 night free from our hotel.com 10 night free 1 night stay

Parkroyal Serviced Suites Kuala Lumpur, Studio Suite, 1 King Bed

Since the restaurant only starts at 5:30pm for its dinner seating, we decided to visit the Miru Dessert Cafe for some afternoon tea first. Miru is located within Pavilion Mall itself. Similar to After You cafe in Bangkok, it sells the Shibuya Honey Toast which we absolutely love!

Shibuya Honey Toast for RM 20.05
We noticed that there was a Eureka stall outside the Miru and bought A LOT of popcorn (bought 9 big packets and were given 2 medium and 3 small packets for free). Kaisu Singaporeans!

9 big packets of Eureka for RM 122.70
We were already half full by then, but it was time for our char siew! We walked to the Restaurant Oversea Imbi which is located 550m away from the shopping mall. We ordered the medium-sized char siew and 8 pcs of homemade tofu. Perhaps we were too full at that point in time, I find the char siew a bit underwhelming and too gelat for my liking as it was too sticky and fattening. The tofu, on the other hand, was fabulous. The tofu was smooth, silky and taste simply like beancurd. I will let the photos do the talking!


This meal costs RM 123

Day 2


- Sze Ngan Chye Roast Duck and Century egg lean meat porridge
- Sum Hou Bak Kut Teh
- Haagen Dazs @ One Utama
- The Beato Steakhouse, Bangsar

The next morning, we decided to have roast duck for breakfast. I know it's a bit too heavy for breakfast, but we don't exactly have a choice as the Sze Ngan Chye (四眼仔) Roast Duck, which is located on Jalan Petaling/KL's Chinatown, opens at 6am and closes at 1pm daily (and probably sells out much earlier than that).

The Sze Ngan Chye Roast Duck operates in a pushcart stall along the Chinatown. You can order half or whole duck and the duck meat is wrapped with a layer of plastic bag and newspaper. It comes with a packet of dipping sauce. As it only allows for takeaways, we bought a half duck from there and a packet of porridge from a nearby stall to bring back to the hotel. The roast duck was so so so good. The meat is tender and succulent and the skin has a light crisp. Everything about it was spot on!


Sze Ngan Chye (四眼仔) Half a Roast Duck for RM 30
Our next venue was the Sum Hou Bak Kut Teh located at Desa Sri Hartamas. This shop sells the herbal (black) Bak Ku Teh which KPO and I prefer. You can order the type of meat and vegetables to be added to the soup and also side dishes to go with the rice. Overall, it was a pleasant experience though slightly pricey in my opinion.

This meal cost RM 82.50 
I will skip the review on Haagen Dazs. The reason we visited the One Utama mall because we needed to walk after all the eating...but we ended up in a Haagen Dazs cafe to eat again! Goodness.

Häagen-Dazs Paradise for RM 46.10
We reserved a spot at The Beato Steakhouse, Bangsar for dinner. Both KPO and I are beef lovers, so when our relative recommended us this place which sells dry aged beef at just one-third of Fat Cow's price, we jumped at it immediately. We ordered the 300g wagyu ribeye steak which was absolutely amazing. The meat is well marbled, tender and juicy and the service staff was also attentive to details. Highly recommend this place to people visiting the area!

This meal costs RM 276.60

Day 3


- The Mansion Tea Stall - Roti Canai
- Ikan Bakar Seri Melaka
- The Sushi Teh
- Nitro Cold brew Peach tea at The Coffee Bean
- SS2 Pasar Malam + Durian

The Mansion Tea Stall was a place which sells Roti Canai (aka Roti Prata in SG context) and I saw it first on Youtube from a food vlogger Mark Wiens. Unlike the local Roti Prata where the curry is served separate from the flatbread, the Roti Canai (tsunami) is an Indian-influenced dish where the flatbread is mixed with the curry, sambal chili and two half boiled eggs. I can understand why it is called the tsunami. It is a complete mess, but it tastes so good, especially the sambal which adds a savory spiciness to the food. KPO thinks the Roti Canai at The Mansion Tea is better than our local Roti Prata. Don't expect it to be a clean fancy place though.

2 Roti Canai (tsunami) + 2 Tea for RM 11
Similarly, the Ikan Bakar Seri Melaka was introduced by Mark Wiens in his video. The Ikan Bakar (directly translated as burned fish) is a grilled fish dipped in sambal sauce. The Ikan Bakar place recommended in the video was located at some ulu location and we had to Grab there for it. However, the food was rather disappointing as the fish, sotong and stingray which we ordered were a little overcooked/dry. Will not recommend this place.

This meal costs RM 43
I will skip the Sushi Teh (#salmonbelly) and Coffee Bean because obviously there's nothing too special about the food. We just ate there because it's cheaper than in Singapore.

Our last venue for the day is SS2 Pasar Malam and durian feast. SS2 is in fact no longer part of Kuala Lumpur, but not too far away from where we stayed. We took a train down to SS2 as this place is famous for the night market aka Pasar Malam and the durians. Since it's the durian season, how can we miss this?! We ordered some street food in the Pasar Malam such as the must-eat fried carrot cake, char kuey tiao, etc but making sure that our tummies are not completely filled so that we have room for the durians!


The durians are actually not cheap... The Mao Shan Wang durian costs around RM55/kg. That's almost the same as what we can get in Singapore, but it certainly lives up to its name! The durian flesh is dry, fleshy and bitter. Simply delicious!


Overall, KPO and I felt that the food in SS2 is just so-so. Perhaps we did not manage to buy from the right stalls. However, it is still a good experience as the Pasar Malam is so huge and there are many things to see and buy. For those who intend to visit the Pasar Malam, remember that the SS2 Pasar Malam is only open on Mondays.


Day 4


- Nasi Lemak from Antarabangsa (Grab Food)
- Feeka Coffee + Eggs Benedict
- Restoran Char Siew Yoong
- Plaza Premium Lounge

On our last day, we woke up with a sudden realization that we have not had Nasi Lemak in Malaysia! How can we?! Hence, we decided to order it via Grab Food from Nasi Lemak Antarabangsa. It was a let down though. Our Nasi Lemak looked like an absolute disaster when it came. The meat was also dry and the sambal was too little. Oh well.

Nasi Lemak for RM 6.90 with a delivery fee of RM 5
As the food was simply too unsatisfactory, we googled and realized that there was a well-rated cafe near our hotel - Feeka Coffee Roasters. We decided to have our brunch there and ordered the cappuccino and Eggs Benedict. The coffee was good, Eggs Benedict was so-so but still cheap after exchange rate conversion.


This meal costs RM 47.70
Before we head to the airport, our friend who saw our photos on Instagram and realized that we were in Kuala Lumpur, texted us to try the char siew at Char Siew Yoong. We decided to give it a go and this was the best decision ever. The char siew was much better than the Restaurant Oversea. Every piece of the meat has a balanced amount of fats and lean meat and was well charred. By the time we left the place at 1pm, all the char siew and siew yok were completely sold out. So thankful that we managed to reach in time. For people who intend to visit the place, highly recommend you to call and pre-order the char siew to avoid disappointment.


This meal costs RM 29.80
After that, we decided to head down to the Plaza Premium Lounge at the KLIA2 airport since we had some time to spare. The variety was a little limited to be honest, but we noticed that it serves chicken rice there and the rice was surprisingly good. KPO had two servings of the chicken rice even after eating so much in Kuala Lumpur!


In total, we spent SGD $914 with food being the highest category!


That's all that we had in KL *burp*. Do let us know if you have any food recommendations at KL in the comments section below so that we can visit in our next trip. Till then.

Do like any of the following for the latest update/post!
1. FB Page - KPO and CZM
2. Twitter - KPO and CZM
3. Click here to subscribe using email :)
4. Instagram - KPO_and_CZM (Did you see those delicious food photos to the right --> Unfortunately, you can't see it on mobile.)